SOAP REBATCH
All is not lost if your soap turns out dry and crumbly. Rebatch it!
http://riverleasoap.blogspot.com/
Really pretty! But alas when I cut it is was crumbly and hard, a sure sign that something had gone wrong. So it got grated and remade.
INGREDIENTS:
Grated Scraps: 1177.5 gr
Water: 28.6 gr
BaseOil: Castor 18.2 gr
FO: FO of choice 37.0 ml
METHOD:
Prepare your mould ahead of time.
Take the grated soap and place it in a microwave jug or heavy duty plastic bucket. It’s going to get very hot.
Take all your wet ingredients, except the Fragrance oil and pour that over the grated soap.
Place the jug/bucket in the microwave and microwave the mixture on 50% strength for 5 minutes.
Take it out and see if it has started to melt. If not do another 2 minutes on 50%. All microwaves are different so you will have to eyeball it.
Place back in the microwave on high for 1 minute. You should have a melted mass of soap. If it is not all melted then keep going in 30 second bursts until it is all melted. You are looking for Apple sauce like mixture. Unfortunately no picture is available.
You may need to add more water if it is really thick. Don’t add too much though as your soap will be very soft and you will have to wait for the water to evaporate from the soap.
Once the mixture has cooled slightly add your fragrance oil and mix really well. Pour into your mould and leave for a few hours or over night.
Once it has cooled down and set, you can cut the soap and if it is hard enough.
Sunday, February 17, 2013
Easy Liquid Soap
EASY SOAP LIQUID
http://tipnut.com/how-to-make-homemade-soap/
1 bar soap (6 oz)
1 TBS honey
1 tsp glycerin
Grate bar into small flakes, toss in blender.
Whip in 1 cup boiling water.
Add 1/2 cup room temperature water and stir in blender.
Stir in honey and glycerin.
Allow to cool (15 minutes) then whip again.
Mixture should be 2 cups at this point. Top with cool water until it measures between 5 and 6 cups, whip.
Pour into containers and allow to cool (do not put lids or caps on yet).
After an hour, close containers. Mixture will thicken up.
Shake before using as needed.
Optional: A herbal infusion can be used, just strain first.
Source: Pearls of Country Wisdom by Debora S. Tukua
Another version:
Save leftover bits (or grate one) then toss in a glass mason jar and top with boiling water (about double the amount of soap bits). Stir then seal with lid. Shake jar a few times while it’s cooling to get rid of any clumps. Once cooled, stir well and add a few drops of essential oil if a scented version is desired.
Pour into bottle then top with water as needed to get the right consistency (shake well). If for some reason it’s too thin, simply melt a bit of grated soap in a little hot water then combine with first mixture to thicken.
Saturday, February 16, 2013
Soap~Easy Room Temp Method
SOAP ROOM TEMP METHOD
This recipe is for semi-experienced soap makers. Be sure to research before jumping in. It is not something to be taken lightly. Lye burns, and keeps burning unless rinsed with Vinegar and then cool water!
Be sure to wear safety gear, protective safety glasses, long sleeves and long rubber gloves, and work in a very well ventilated area. Have an open bottle of Vinegar within arms reach at all times in case of a splatter on spill. Vinegar neutralized Lye. Clear the room of pets and children.
Here is where I first learned the room temp method then modified it (below).
http://www.soap-making-essentials.com/how-to-make-soap-roomtemp.html
"You don't heat any oils and you don't check temperatures using the room temperature method. This is now my favorite method by far!!
What could be better than being able to make beautiful soaps without having to use any heat source? How about no long waits for the oils and lye to cool...or worse, cold water or ice baths to bring down temperatures. And no thermometers!
It's fast, easy, efficient and in my opinion, much more fun.
These basic instructions on how to make soap using the room temperature method assume you have already read about sodium hydroxide safety.
The Room Temperature Method
Prepare your soap mold and measure out the additives such as scent, colour, botanicals or any soap bits you may be using and set them all aside.
Weigh out and place all hard oils (butters, coconut oil, palm oil, tallow, lard, etc) into your soaping container.
Weigh out the liquid oils and set them aside as well.
Prepare your lye solution by first weighing out the water and then the sodium hydroxide. Slowly pour the sodium hydroxide into the water and gently stir until the crystals dissolve.
Once the lye solution has become clear, you can slowly pour it over the hard oils in your soap pot. The lye solution will be very hot and that heat is what will melt your hard oils.
Gently mash the hard oils down into the lye solution with your whisk and slowly stir until the hard oils have completely melted.
It may take awhile but be patient and keep gently stirring.
Add the liquid oils to the soap pot and whisk together.
Using your stick blender, mix the soap batter in short bursts alternating with hand stirring until the soap reaches a thin trace.
You can now add your scent, colour and other additives. Blend and pour into your soap mold. Cover the soap, wrap and insulate until the soap gels.
Easy, peasy and you're done!"
You are done, but the soap will still need to cure 4-6 weeks or more. I take it a step further so I can use the soap right away. I do not like to wait for my creations to cure!
If you use a large Crock pot set on low heat after trace, put the lid on and let it cook for an hour or so (stirring every 15 minutes to cook evenly) it will go through saponification right in the Crock pot. Be sure to pH test it before scooping into molds. Hp Soap is normally lumpy, and a lot thicker than CP soap. I found the secret to making it smooth and creamy just like CP! Add a teaspoon of sugar to the lye water and increase the water by 5-10%. It will take a little longer to trace, but well worth it! See for yourself below.
 Bayberry Cinnamon 3 Layer Soap with oxides for coloring, Hot Process soap made in the Crock Pot. Smells wonderful! Enchanted Rain Soap by Sunflower Acres
This recipe is for semi-experienced soap makers. Be sure to research before jumping in. It is not something to be taken lightly. Lye burns, and keeps burning unless rinsed with Vinegar and then cool water!
Be sure to wear safety gear, protective safety glasses, long sleeves and long rubber gloves, and work in a very well ventilated area. Have an open bottle of Vinegar within arms reach at all times in case of a splatter on spill. Vinegar neutralized Lye. Clear the room of pets and children.
Here is where I first learned the room temp method then modified it (below).
http://www.soap-making-essentials.com/how-to-make-soap-roomtemp.html
"You don't heat any oils and you don't check temperatures using the room temperature method. This is now my favorite method by far!!
What could be better than being able to make beautiful soaps without having to use any heat source? How about no long waits for the oils and lye to cool...or worse, cold water or ice baths to bring down temperatures. And no thermometers!
It's fast, easy, efficient and in my opinion, much more fun.
These basic instructions on how to make soap using the room temperature method assume you have already read about sodium hydroxide safety.
The Room Temperature Method
Prepare your soap mold and measure out the additives such as scent, colour, botanicals or any soap bits you may be using and set them all aside.
Weigh out and place all hard oils (butters, coconut oil, palm oil, tallow, lard, etc) into your soaping container.
Weigh out the liquid oils and set them aside as well.
Prepare your lye solution by first weighing out the water and then the sodium hydroxide. Slowly pour the sodium hydroxide into the water and gently stir until the crystals dissolve.
Once the lye solution has become clear, you can slowly pour it over the hard oils in your soap pot. The lye solution will be very hot and that heat is what will melt your hard oils.
Gently mash the hard oils down into the lye solution with your whisk and slowly stir until the hard oils have completely melted.
It may take awhile but be patient and keep gently stirring.
Add the liquid oils to the soap pot and whisk together.
Using your stick blender, mix the soap batter in short bursts alternating with hand stirring until the soap reaches a thin trace.
You can now add your scent, colour and other additives. Blend and pour into your soap mold. Cover the soap, wrap and insulate until the soap gels.
Easy, peasy and you're done!"
You are done, but the soap will still need to cure 4-6 weeks or more. I take it a step further so I can use the soap right away. I do not like to wait for my creations to cure!
If you use a large Crock pot set on low heat after trace, put the lid on and let it cook for an hour or so (stirring every 15 minutes to cook evenly) it will go through saponification right in the Crock pot. Be sure to pH test it before scooping into molds. Hp Soap is normally lumpy, and a lot thicker than CP soap. I found the secret to making it smooth and creamy just like CP! Add a teaspoon of sugar to the lye water and increase the water by 5-10%. It will take a little longer to trace, but well worth it! See for yourself below.

Beer Soap Tips
SOAP BEER TIPS
http://www.greatcakessoapworks.com/handmade-soap-blog/index.php/how-to-make-beer-soap/
"What is beer soap?
Quite simply, it is soap that is made with beer as the liquid instead of water. However, let me say that if you have not made beer soap before, you should be fully prepared. It is not for the faint of heart because you will have to work quickly.
You should have quite a few successful batches of cold-processed soap under your belt before attempting this process. In fact, I am not even providing a recipe, only a method. Ok, that’s my disclaimer. You can’t say I didn’t warn you!
After that disclaimer, now let me share WHY you might want to make beer soap. For me, it’s a great marketing hook. I often hear at the market – “Wow! Look at that! Beer soap!” Besides that, beer is also supposed to be a great conditioner for your skin.
First, you will need to prepare the beer and the oils a full day ahead. Using your regular soap recipe, start by pouring the beer (amount should be 40% of the oils – do NOT discount the liquid) into a plastic pitcher (do NOT use pyrex or glass) and letting it get flat. Really flat. If you have carbon dioxide bubbles, you will have lye bubbles which is really not safe. I do this in the morning, so that by evening I can put the pitcher in the refrigerator to get cold overnight. I also melt all my solid oils and butters and combine them with the liquid oils in my soap pot. Then they can cool down to room temperature overnight. You want to do everything you can to slow down saponification.
The next day you can make soap. Here is my flat beer in the plastic pitcher just waiting for the lye to be added:
Cold, Flat Beer
Now I add my lye EVER SO SLOWLY into the beer. Notice that I am wearing rubber gloves. Always wear your safety gear!!
It will turn a lighter yellowish color and start to stink pretty bad. That’s why I always make my lye solution under the fan under my microwave WHICH VENTS OUTSIDE. I also learned to cover the back of my stove with a towel. It seems that little bits of lye have eaten away some of the enamel finish. Oops. Back to the lye solution. If you pour the lye too quickly, the beer will heat up and cause a volcano. Ask me how I know! Fortunately, it was contained on my glass stovetop…
Adding lye to the beer, the color is getting lighter
As the beer continues to heat up, it will turn back to a darker brown.
Beer is heating up, turning dark again
Once I have all the lye incorporated, I usually put the pitcher(s) in my sink with cold water and ice to speed up the cooling process. I’ve noticed that with a regular lye and water solution, the stink will eventually go away when all the lye has been fully incorporated. Not so much with the beer. In fact, the plastic pitcher will probably carry the smell even after you run it through the dishwasher too. So don’t think you can use it for lemonade when you’re finished making soap. NOT that you would use your lye pitcher for lemonade anyway!!
When the temperature of the lye solution reaches about 85-90 degrees, you’re ready to make soap. I do use my stick blender for this soap, but you really wouldn’t have to. It will set up just fine with a spoon. I just like the smoothness of soap that’s been blended with the electric blender. Not to mention the adrenaline rush of trying to get the soap made before it becomes a brick in your soap pot…
After about two seconds of stick blending, I add a little bit of wheat bran to this batch.
After stirring the wheat bran with my spoon, I add my essential oil blend. I like to stick blend this too just to be sure it’s all mixed in. Just for a few seconds though. Once it starts to thicken, it will set up fast.
Time to pour!
You can see that by the time I have it completely poured, it is really getting thick. I have a few seconds to smooth the top with my spoon, put plastic wrap over it, and cover it with a towel.
I usually cut this soap the next day. Sometimes I have to wait two. It requires a full 4-6 weeks to cure. And it really does NOT smell like beer when it’s all done. In fact, even by the time I cut it, all I can smell is the essential oil blend."
You can cut the 4-6 weeks cure time out if you use the Hot Process Crock Pot Method. There is a link in my first post called Fast Soap Making. It has a link to my Facebook page where you will find out more www.facebook.com/pages/Enchanted-Rain-Soap.
 Dark Side Beer Soap with Wheat Germ is the best one yet for any hair type and the Wheat Germ is a great exfoliant when using it as soap! These were made in round Salt boxes lined with waxed paper. SunflowerAcres Shop for Enchanted Rain Soap
I am currently experimenting with easy homemade beer recipes. I will post the recipes as soon as it is ready and tested. Please bookmark this blog and check back!
http://www.greatcakessoapworks.com/handmade-soap-blog/index.php/how-to-make-beer-soap/
"What is beer soap?
Quite simply, it is soap that is made with beer as the liquid instead of water. However, let me say that if you have not made beer soap before, you should be fully prepared. It is not for the faint of heart because you will have to work quickly.
You should have quite a few successful batches of cold-processed soap under your belt before attempting this process. In fact, I am not even providing a recipe, only a method. Ok, that’s my disclaimer. You can’t say I didn’t warn you!
After that disclaimer, now let me share WHY you might want to make beer soap. For me, it’s a great marketing hook. I often hear at the market – “Wow! Look at that! Beer soap!” Besides that, beer is also supposed to be a great conditioner for your skin.
First, you will need to prepare the beer and the oils a full day ahead. Using your regular soap recipe, start by pouring the beer (amount should be 40% of the oils – do NOT discount the liquid) into a plastic pitcher (do NOT use pyrex or glass) and letting it get flat. Really flat. If you have carbon dioxide bubbles, you will have lye bubbles which is really not safe. I do this in the morning, so that by evening I can put the pitcher in the refrigerator to get cold overnight. I also melt all my solid oils and butters and combine them with the liquid oils in my soap pot. Then they can cool down to room temperature overnight. You want to do everything you can to slow down saponification.
The next day you can make soap. Here is my flat beer in the plastic pitcher just waiting for the lye to be added:
Cold, Flat Beer
Now I add my lye EVER SO SLOWLY into the beer. Notice that I am wearing rubber gloves. Always wear your safety gear!!
It will turn a lighter yellowish color and start to stink pretty bad. That’s why I always make my lye solution under the fan under my microwave WHICH VENTS OUTSIDE. I also learned to cover the back of my stove with a towel. It seems that little bits of lye have eaten away some of the enamel finish. Oops. Back to the lye solution. If you pour the lye too quickly, the beer will heat up and cause a volcano. Ask me how I know! Fortunately, it was contained on my glass stovetop…
Adding lye to the beer, the color is getting lighter
As the beer continues to heat up, it will turn back to a darker brown.
Beer is heating up, turning dark again
Once I have all the lye incorporated, I usually put the pitcher(s) in my sink with cold water and ice to speed up the cooling process. I’ve noticed that with a regular lye and water solution, the stink will eventually go away when all the lye has been fully incorporated. Not so much with the beer. In fact, the plastic pitcher will probably carry the smell even after you run it through the dishwasher too. So don’t think you can use it for lemonade when you’re finished making soap. NOT that you would use your lye pitcher for lemonade anyway!!
When the temperature of the lye solution reaches about 85-90 degrees, you’re ready to make soap. I do use my stick blender for this soap, but you really wouldn’t have to. It will set up just fine with a spoon. I just like the smoothness of soap that’s been blended with the electric blender. Not to mention the adrenaline rush of trying to get the soap made before it becomes a brick in your soap pot…
After about two seconds of stick blending, I add a little bit of wheat bran to this batch.
After stirring the wheat bran with my spoon, I add my essential oil blend. I like to stick blend this too just to be sure it’s all mixed in. Just for a few seconds though. Once it starts to thicken, it will set up fast.
Time to pour!
You can see that by the time I have it completely poured, it is really getting thick. I have a few seconds to smooth the top with my spoon, put plastic wrap over it, and cover it with a towel.
I usually cut this soap the next day. Sometimes I have to wait two. It requires a full 4-6 weeks to cure. And it really does NOT smell like beer when it’s all done. In fact, even by the time I cut it, all I can smell is the essential oil blend."
You can cut the 4-6 weeks cure time out if you use the Hot Process Crock Pot Method. There is a link in my first post called Fast Soap Making. It has a link to my Facebook page where you will find out more www.facebook.com/pages/Enchanted-Rain-Soap.

I am currently experimenting with easy homemade beer recipes. I will post the recipes as soon as it is ready and tested. Please bookmark this blog and check back!
Soap Storing
SOAP STORING
http://www.netplaces.com/soapmaking/presenting-your-soap/storing-soap.htm
"Keep soap at its best through proper storage. Don't store soap in sealed plastic storage boxes or bags. Store soap out of direct sunlight. Keep your soap where it won't be exposed to extreme shifts in humidity and temperature.
Sealing lye soap in plastic will cause rancidity. Soap that gets lots of direct sunlight will heat up and cool down, causing rancidity through breakdown of oils, and scent and color will fade. Soap that is exposed to high humidity can get slimy because the glycerin in the soap is a humectant; it attracts moisture from the air.
Curing
If you make soap on a limited basis — 2 or 3 pounds at a time, for example — you can easily use a shelf on a bookcase for curing and storage. If you find yourself continually running out of room, get a set of plastic shelves you can put up and take down as needed. And if you get to the stage where you are a constant soap maker, you may as well just give in and buy or make a soap-curing/storage rack.
Use soap in the order it was made. Soap that is older will last longer than a fresh bar of the same recipe. Be sure to keep “made on” and “use by” dates on your soap storage boxes and racks.
You can modify a bookcase or start from scratch to create your soap rack. The best ones have surfaces of wire mesh. Heavy wire mesh with ?-inch openings works great. Shelves that slide out for loading are ideal. Place freshly-cut soaps on the rack, spaced about ½ to 1 inch apart. Turn the soaps every few days to be sure they dry evenly. After a few weeks, when the surfaces are dry to the touch, you can stack them more closely. Try to space your soap making so that you can rotate partially cured soap out as you place the freshly cut soaps.
After Curing
After a month of curing, cardboard or paperboard shoe boxes are useful for storing your soap. Line the box with plain paper — brown kraft paper is good. Place the soaps loosely in the box. Cut ventilation holes in the lid and sides so that the soap will be protected from light and dust and still get some air.
Be sure to always label your storage system with soap variety, date created, cure date, move-to-storage date, expected expiration date, and other information that will help you remember the details about each batch. Observe and record the changes your soap goes through as it ages. Again, keeping records is one of your most useful tools in progressing in your craft."

Friday, February 15, 2013
Soap Mold Tips
SOAP MOLD TIPS
http://www.moldmarket.com/faq.html
"Mold Tips for CP (cold process) soapers:
Do not use oil in the molds, it will make the CP stick more because the traced soap wants to grab onto the oils. When you get a new mold, wash it in warm soapy water, rinse and dry with a soft towel and buff it.
Use borax in the water before you add the lye. Add 2 tsp of Borax for every 6 oz of water, stir till it's dissolved and then add your lye to it. What this will do is firm up the CP and make releasing it a breeze.
If the top part of the CP is hard and the bottom is mushy, it might not have had a full trace.
If using Palm Oil as part of your recipe, stir the oil before scooping it out on your scale. Most soap makers do not know that the Oleic Fatty Acid in the Palm Oil will sink to the bottom of the container as the oil solidifies and the other fatty acids will float to the top. If the Palm Oil is just scooped out from the top of the container, you get a soft soap but as you get to the bottom of the container, you'll find you get a harder bar of soap because the Oleic Fatty Acid has sunk down. when using a 5 gallon bucket of oil, dig a hole down into the Palm Oil and start scooping the oil out from the bottom to the top so you have a mix of complete oil.
If the CP sticks in the mold... do not force it out but instead put the whole mold into the freezer for 30 minutes, take it out and let the plastic mold come to room temperature which is about 2 minutes. Put a towel on the counter and turn the mold over on the towel, now put your fingers under the mold and gently pull the sides of the mold to allow air in and then with your thumbs on top of the mold, press as your go around the mold. You should see the air releasing it from the mold.
Using too much water in a cold process soap recipe will cause the soap to be soft and take much longer to cure.
Borax - is not a detergent, it is called "desert salt" and it will not only soften the water more but will also generate more lather in the soap.
Cold process soaps made with milk usually stick and are better left within the mold longer then 24 hours because part of the soap will be left behind in the mold. Use a small amount of warm water and mix borax into it since milk won't dissolve in the borax. If you can't get soap out of the mold, freeze it from 30 minutes and up to an hour. Then, flip the mold onto a towel and put a "warm" towel on the mold to bring the plastic to room temperature. Once it's room temp, "gently" pull away the sides of the mold and watch to see if you get air pockets. Once you see air pockets, press on the mold with thumbs or the palm of the hand and watch the air pocket move in that area. The soap releases and comes out of the mold.
Another option to getting soaps easily out of the mold is by using a small amount of Sodium Lactate in the cold process recipe because it will really harden the soap!"
Cheap mold ideas:
Recycled wooden sewing machine drawers lined with waxed paper or recycled cereal bags are great for rectangle soap bars, and Pringles cans, round Bread crumb containers, and Salt boxes work fantastic for round disks.
 Chamomile Tea Soap made in a Pringles can with Hot Process Crock Pot method.
www.SunflowerAcres.ecrater.com
http://www.moldmarket.com/faq.html
"Mold Tips for CP (cold process) soapers:
Do not use oil in the molds, it will make the CP stick more because the traced soap wants to grab onto the oils. When you get a new mold, wash it in warm soapy water, rinse and dry with a soft towel and buff it.
Use borax in the water before you add the lye. Add 2 tsp of Borax for every 6 oz of water, stir till it's dissolved and then add your lye to it. What this will do is firm up the CP and make releasing it a breeze.
If the top part of the CP is hard and the bottom is mushy, it might not have had a full trace.
If using Palm Oil as part of your recipe, stir the oil before scooping it out on your scale. Most soap makers do not know that the Oleic Fatty Acid in the Palm Oil will sink to the bottom of the container as the oil solidifies and the other fatty acids will float to the top. If the Palm Oil is just scooped out from the top of the container, you get a soft soap but as you get to the bottom of the container, you'll find you get a harder bar of soap because the Oleic Fatty Acid has sunk down. when using a 5 gallon bucket of oil, dig a hole down into the Palm Oil and start scooping the oil out from the bottom to the top so you have a mix of complete oil.
If the CP sticks in the mold... do not force it out but instead put the whole mold into the freezer for 30 minutes, take it out and let the plastic mold come to room temperature which is about 2 minutes. Put a towel on the counter and turn the mold over on the towel, now put your fingers under the mold and gently pull the sides of the mold to allow air in and then with your thumbs on top of the mold, press as your go around the mold. You should see the air releasing it from the mold.
Using too much water in a cold process soap recipe will cause the soap to be soft and take much longer to cure.
Borax - is not a detergent, it is called "desert salt" and it will not only soften the water more but will also generate more lather in the soap.
Cold process soaps made with milk usually stick and are better left within the mold longer then 24 hours because part of the soap will be left behind in the mold. Use a small amount of warm water and mix borax into it since milk won't dissolve in the borax. If you can't get soap out of the mold, freeze it from 30 minutes and up to an hour. Then, flip the mold onto a towel and put a "warm" towel on the mold to bring the plastic to room temperature. Once it's room temp, "gently" pull away the sides of the mold and watch to see if you get air pockets. Once you see air pockets, press on the mold with thumbs or the palm of the hand and watch the air pocket move in that area. The soap releases and comes out of the mold.
Another option to getting soaps easily out of the mold is by using a small amount of Sodium Lactate in the cold process recipe because it will really harden the soap!"
Cheap mold ideas:
Recycled wooden sewing machine drawers lined with waxed paper or recycled cereal bags are great for rectangle soap bars, and Pringles cans, round Bread crumb containers, and Salt boxes work fantastic for round disks.

www.SunflowerAcres.ecrater.com
Soap Colorants Explained~Natural?
Have you ever wondered if the colorants used in soap making are really natural? Me too! Here is an interesting article I found in my late night research. I am in love with dusting 24 kt. Gold Mica on my White and plain color soaps to add some bling and sparkle!
DYES, PIGMENTS, LAKES, MICAS
http://www.tkbtrading.com/content.php?content_id=13
"DYES: Drug Association (FDA) is the arm of the federal government which regulates the use of color additives in Food, Drugs and Cosmetics. "Natural" color additives are classified by the FDA as colors coming directly from plants or animals. The cosmetic grade natural colors are: annatto, carotene, carmine, caramel, henna. These natural colors are all dyes. There are also plenty of natural dyes which are not approved for use in cosmetics (but are fine in soap) such as turmeric, or chlorophyll.
PIGMENTS: Could be a Natural Dye derived from plants or animals, or could be a Coal Tar Dye, which is not natural.
Coal Tar Dyes have been shown to cause cancer in animals, and they are an irritant to some people.
LAKES: Iron Oxides, and similar mineral pigments are not, by FDA standards, "Natural", because they are not directly from plants or animals. Instead, they come from minerals.
While considered "natural" by consumers, cosmetic-grade pigments are all man-made in order to meet FDA approval.
Lake colors are always derived from the Coal Tar Dyes and therefore are never considered Natural.
MICA: Minerals formed in the earth
-----------------------------------------------------------------
What are Soap Colorants?
Oxides & Ultramarines: These are powdered pigments, made from oxidized metals such as iron and titanium. They occur naturally in the earth, but for cosmetic use it is much safer and less expensive to use manufactured versions. They are very commonly used in eye shadows and other cosmetics. For more info on titanium dioxide as an example, see Wikipedia article on Titanium Dioxide.
Micas: Micas are also powdered pigments, but are a bit more complex. They usually contain an oxide component, along with actual powdered mica mineral. Natural mica is basically a type of rock, that features thin glittery, flaky layers. This is combined with various oxides and some other ingredients (see INCI names in each mica color's description in our catalog) to create the variety of cosmetic mica colors (as well as micas for other applications). See also the Wikipedia article on Mica.
Cosmetic Clays: Also in powdered form, clays are found naturally around the Mediterranean Sea. Different metal compositions form the different colors and different reputed skin benefits. These create a slippery, lathery feel in soap and a softly colored and earthy yet shiny look.
Are these colorants natural? This is a much debated topic. Although the term natural has no legal definition in the U.S., our opinion is these are not natural colorants. They are synthesized and manufactured, not gathered or harvested. We feel the only natural colorants for soaps are spices and some botanicals. The problem with the latter is they tend to be very dull and earthy, with a limited range of color, and can often fade or change over time. So for a nice range of bright and (mostly) stable colors, our pigments and dyes are a safe, time-tested method of coloring soap."
--------------------------------------------------------------------------------
Cold Process Soap Usage Tips:
http://symphonyscents.com/catalog/index.php
"Micas: Some Micas can be used readily in CP soap, some are tricky, and some are not usable because they will fade out.
The best, most stable colors to use are: Copper, Gold Dust, Mocha Shimmer, Sunshine Yellow, and Tan Opal.
The tricky ones will not fade but may morph or change a bit: Coral, Pearl Mauve, Sea Foam, and Sparkle Pink.
The colors which will fade out in CP soap are: Emerald Green, Lavender, and Sapphire Blue.
Use about a teaspoon of mica for each pound of soap in your batch. Just add the mica directly to your base oils, blend thoroughly with a stick blender (or by hand) to incorporate. Make sure they are thoroughly blended or you will get clumps in your soap. Or, you can add the colorant at thin trace if desired.
Another method is to mix some mica in a tablespoon of oil and drizzle in the color to achieve the color that you desire.
Ultramarines and Oxides: These can be dissolved into water or oil. The yellow, chromium green and red oxides work much better when dissolved in oil; the others in water. Start with about 1/2 teaspoon per pound (1/4 tsp per pound for Red Oxide or Chromium Green Oxide). Mix with 1/2 tsp of hot water or room temp oil. Blend into your base oils, or add at trace. Lori prefers adding colorants (mixed in oil or water) directly to her base oils for single color soaps to insure complete blending of colors.
Cosmetic Clays: Use about 1/2 teaspoon per pound of soap. Drop right in with your base oils, or after mixing with lye water."
Fragrance Free Vegan Soap, one of my first with Gold Mica.
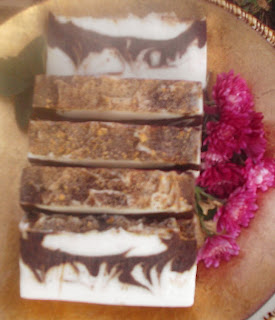
 My first attempt with the swirl method (below). These are made with Coffee and Dark Chocolate in the center layer, and Honey Almond fragrance oil in the White layers, dusted with Cocoa powder and Gold Mica. Smells wonderful!
DYES, PIGMENTS, LAKES, MICAS
http://www.tkbtrading.com/content.php?content_id=13
"DYES: Drug Association (FDA) is the arm of the federal government which regulates the use of color additives in Food, Drugs and Cosmetics. "Natural" color additives are classified by the FDA as colors coming directly from plants or animals. The cosmetic grade natural colors are: annatto, carotene, carmine, caramel, henna. These natural colors are all dyes. There are also plenty of natural dyes which are not approved for use in cosmetics (but are fine in soap) such as turmeric, or chlorophyll.
PIGMENTS: Could be a Natural Dye derived from plants or animals, or could be a Coal Tar Dye, which is not natural.
Coal Tar Dyes have been shown to cause cancer in animals, and they are an irritant to some people.
LAKES: Iron Oxides, and similar mineral pigments are not, by FDA standards, "Natural", because they are not directly from plants or animals. Instead, they come from minerals.
While considered "natural" by consumers, cosmetic-grade pigments are all man-made in order to meet FDA approval.
Lake colors are always derived from the Coal Tar Dyes and therefore are never considered Natural.
MICA: Minerals formed in the earth
-----------------------------------------------------------------
What are Soap Colorants?
Oxides & Ultramarines: These are powdered pigments, made from oxidized metals such as iron and titanium. They occur naturally in the earth, but for cosmetic use it is much safer and less expensive to use manufactured versions. They are very commonly used in eye shadows and other cosmetics. For more info on titanium dioxide as an example, see Wikipedia article on Titanium Dioxide.
Micas: Micas are also powdered pigments, but are a bit more complex. They usually contain an oxide component, along with actual powdered mica mineral. Natural mica is basically a type of rock, that features thin glittery, flaky layers. This is combined with various oxides and some other ingredients (see INCI names in each mica color's description in our catalog) to create the variety of cosmetic mica colors (as well as micas for other applications). See also the Wikipedia article on Mica.
Cosmetic Clays: Also in powdered form, clays are found naturally around the Mediterranean Sea. Different metal compositions form the different colors and different reputed skin benefits. These create a slippery, lathery feel in soap and a softly colored and earthy yet shiny look.
Are these colorants natural? This is a much debated topic. Although the term natural has no legal definition in the U.S., our opinion is these are not natural colorants. They are synthesized and manufactured, not gathered or harvested. We feel the only natural colorants for soaps are spices and some botanicals. The problem with the latter is they tend to be very dull and earthy, with a limited range of color, and can often fade or change over time. So for a nice range of bright and (mostly) stable colors, our pigments and dyes are a safe, time-tested method of coloring soap."
--------------------------------------------------------------------------------
Cold Process Soap Usage Tips:
http://symphonyscents.com/catalog/index.php
"Micas: Some Micas can be used readily in CP soap, some are tricky, and some are not usable because they will fade out.
The best, most stable colors to use are: Copper, Gold Dust, Mocha Shimmer, Sunshine Yellow, and Tan Opal.
The tricky ones will not fade but may morph or change a bit: Coral, Pearl Mauve, Sea Foam, and Sparkle Pink.
The colors which will fade out in CP soap are: Emerald Green, Lavender, and Sapphire Blue.
Use about a teaspoon of mica for each pound of soap in your batch. Just add the mica directly to your base oils, blend thoroughly with a stick blender (or by hand) to incorporate. Make sure they are thoroughly blended or you will get clumps in your soap. Or, you can add the colorant at thin trace if desired.
Another method is to mix some mica in a tablespoon of oil and drizzle in the color to achieve the color that you desire.
Ultramarines and Oxides: These can be dissolved into water or oil. The yellow, chromium green and red oxides work much better when dissolved in oil; the others in water. Start with about 1/2 teaspoon per pound (1/4 tsp per pound for Red Oxide or Chromium Green Oxide). Mix with 1/2 tsp of hot water or room temp oil. Blend into your base oils, or add at trace. Lori prefers adding colorants (mixed in oil or water) directly to her base oils for single color soaps to insure complete blending of colors.
Cosmetic Clays: Use about 1/2 teaspoon per pound of soap. Drop right in with your base oils, or after mixing with lye water."
Fragrance Free Vegan Soap, one of my first with Gold Mica.


Subscribe to:
Comments (Atom)